概述
Springboot通过整合Mybatis对数据库进行相关操作,这里数据库连接池还是使用Springboot默认的连接池tomcat.jdbc.pool,我们不再配置Druid或者其他连接池,关于Springboot如何整合Druid或者其他连接池,后面鹏哥会给出。
整合
导入数据库驱动依赖
//数据库驱动<dependency>
   <groupId>mysql</groupId>
   <artifactId>mysql-connector-java</artifactId>
   <scope>runtime</scope></dependency>//mybatis依赖<dependency>
   <groupId>org.mybatis.spring.boot</groupId><artifactId>mybatis-spring-boot-starter</artifactId>
   <version>1.1.1</version></dependency>
当然,依赖可以通过idea中的Sping插件创建项目时候快速选择即可,配置文件中配置数据源信息
#数据源
spring.datasource.driver-class-name=com.mysql.jdbc.Driverspring.datasource.url=jdbc:mysql://localhost:3306/db_testspring.datasource.username=root
spring.datasource.password=root
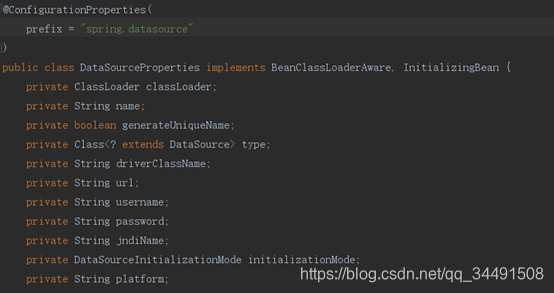
注意:我们这里配置完成后,Springboot是如何加载这些信息的呢?这就涉及到Springboot自动配置原理,启动之后boot中的数据源配置类,如下会自动给我们配置
接下来就是开发了,mybatis可以通过注解开发也可以通过写xml文件的形式开发
注解的方式开发:
创建一个接口UserMapper,如下:
public interface UserMapper {    @Select("select * from user")    List<User> getAllUsers();    @Results({            @Result(property = "id", column = "id"),            @Result(property = "username", column = "u"),            @Result(property = "address", column = "a")
    })    @Select("select username as u,address as a,id as id from user where id=#{id}")    User getUserById(Long id);    @Select("select * from user where username like concat('%',#{name},'%')")    List<User> getUsersByName(String name);    @Insert({"insert into user(username,address) values(#{username},#{address})"})    @SelectKey(statement = "select last_insert_id()", keyProperty = "id", before = false, resultType = Integer.class)    Integer addUser(User user);    @Update("update user set username=#{username},address=#{address} where id=#{id}")    Integer updateUserById(User user);    @Delete("delete from user where id=#{id}")    Integer deleteUserById(Integer id);
}
@Select、@Insert、@Update 以及 @Delete 四个注解分别对应 XML 中的 select、insert、update 以及 delete 标签,@Results 注解类似于 XML 中的 ResultMap 映射文件,@SelectKey 注解可以实现主键回填的功能,即当数据插入成功后,插入成功的数据 id 会赋值到 user 对象的id 属性上。
UserMapper 创建好之后,还要配置 mapper 扫描,有两种方式,一种是直接在 UserMapper 上面添加 @Mapper 注解,这种方式有一个弊端就是所有的 Mapper 都要手动添加,要是落下一个就会报错,还有一个一劳永逸的办法就是直接在启动类上添加 Mapper 扫描,如下:
@SpringBootApplication@MapperScan(basePackages = "com.javayihao.top.dao")public class MybatisApplication {    public static void main(String[] args) {
        SpringApplication.run(MybatisApplication.class, args);
    }
}
xml方式开发
首先还是要创建一个接口UserMapper
public interface UserMapper {    List<User> getAllUser();    Integer addUser(User user);    Integer updateUserById(User user);    Integer deleteUserById(Integer id);
}
然后创建UserMapper.xml
<?xml version="1.0" encoding="UTF-8" ?><!DOCTYPE mapper
        PUBLIC "-//mybatis.org//DTD Mapper 3.0//EN"
        "http://mybatis.org/dtd/mybatis-21-mapper.dtd"><mapper namespace="com.javayihao.top.dao.UserMapper">
    <select id="getAllUser" resultType="com.javayihao.top.pojo.User">
        select * from t_user;    </select>
    <insert id="addUser" parameterType="com.javayihao.top.pojo.User">
        insert into user (username,address) values (#{username},#{address});    </insert>
    <update id="updateUserById" parameterType="com.javayihao.top.pojo.User">
        update user set username=#{username},address=#{address} where id=#{id}    </update>
    <delete id="deleteUserById">
        delete from user where id=#{id}    </delete></mapper>
此时,关于UserMapper.xml放置的位置有两种:
第一种直接放在和UserMapper接口相同的位置
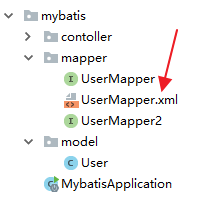
这样的方式有个问题就是maven在打包项目的时候,java目录下的xml资源不会被加载,所以如果放在同接口相同的位置,需要在pom.xml文件中增加如下配置,避免扫描不到xml文件
<build>
    <resources>
        <resource>
            <directory>src/main/java</directory>
            <includes>
                <include>**/*.xml</include>
            </includes>
        </resource>
        <resource>
            <directory>src/main/resources</directory>
        </resource>
    </resources></build>
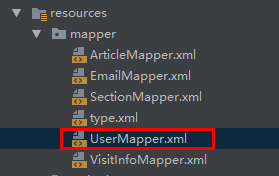
第二种:放在resources下面
放在 resources 目录下,这样就不用担心打包时被忽略了,记着在mapper接口类使用mapper注解,app启动类配置mapperscan注解
还需在配置文件中告诉mybatis去哪扫描mapper
mybatis.mapper-locations=classpath:mapper/*.xml
至此 Springboot整合mybatis完成
相关推荐


0评论