我们倾向于使用HTML与CSS、JavaScript等,使我们的网站或博客看起来更有吸引力。下面是一些很酷的HTML技巧,你可以用它来建立一个真正的动态网站。
我们倾向于使用HTML与CSS、JavaScript等,使我们的网站或博客看起来更有吸引力,但你知道仅HTML就有很多实用的秘密,可能会派上用场,帮助你设计一个华丽的网站?
下面是一些很酷的HTML技巧,你可以用它来建立一个真正的动态网站。

技巧1. Image Maps
image map基本上是具有可点击区域的图像。我们可以使用该可点击区域链接到网页的其他部分、文档或新链接。
好吧,并不是每个人都知道<map>元素可以定义用户可以单击的图像区域。我们需要做的就是使用<area>元素并在<map>元素中提及其对应的 XY 坐标。
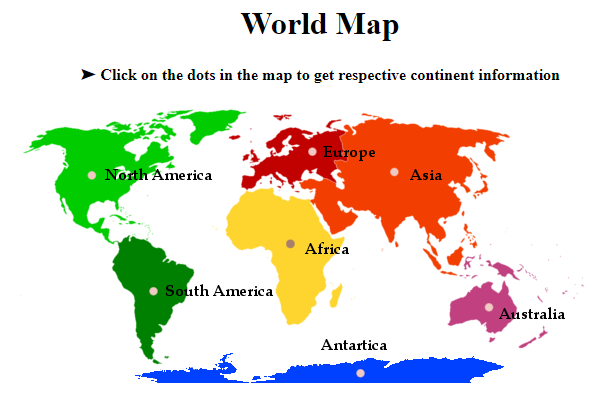
下面是一个例子,你的网站访问者可以在点击世界地图的不同大洲时了解你在全球的业务。
<h1 style="text-align:center;">World Map</h1>
<h4 style="text-align:center;">➤ Click on the dots in the map to get respective continent information</h4>
<map name="continents_map">
<area shape="circle" coords="70,70,10" href="https://en.wikipedia.org/wiki/North_America">
<area shape="circle" coords="133,185,10" href="https://en.wikipedia.org/wiki/South_America">
<area shape="circle" coords="270,137,10" href="https://en.wikipedia.org/wiki/Africa">
<area shape="circle" coords="292,44,10" href="https://en.wikipedia.org/wiki/Europe">
<area shape="circle" coords="469,201,10"
href="https://en.wikipedia.org/wiki/Australia">
<area shape="circle" coords="374,65,10" href="https://en.wikipedia.org/wiki/Asia">
<area shape="circle" coords="340,267,10" href="https://en.wikipedia.org/wiki/Antarctica">
</map>
<figure style="text-align:center;">
<img usemap="#continents_map" src=https://bit.ly/2bgFrvL width="600px" />
</figure>
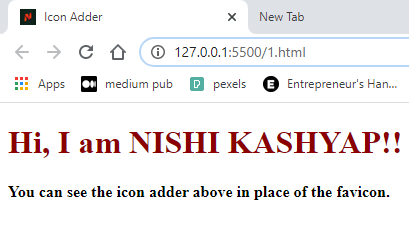
技巧2:Icon Adder
Icon Adder基本上是指使用图标代替网站图标。
你只需要在body标签内的link标签中包含你的源图像文件的路径链接。
<!DOCTYPE html>
<html>
<head>
<title>Icon Adder</title>
<meta name="theme-color" content="green;">
<link rel="icon" href="download.jpg"
type="image/x-icon"/>
<style>
.container {
text-align: left;
}
h1 {
color: darkred;
}
</style>
</head>
<body>
<div class="container">
<h1>Hi, I am NISHI KASHYAP!!</h1>
<b>You can see the icon adder above in place of the favicon.</b>
</div>
</body>
</html>
技巧3:允许用户选择背景颜色
使用此技巧,网站访问者只需将鼠标指针拖到书面文本的某些字母上即可更改其网页的背景颜色。
例子:在这种情况下,访问者可以通过将鼠标指针拖到“Drag Your Mouse Over Letters To Change Colors!”的文字上来改变颜色。
<center>
<a href="" onmouseover="document.bgColor='turquoise'">D</a>
<a href="" onmouseover="document.bgColor='pink'">r</a>
<a href="" onmouseover="document.bgColor='blue'">a</a>
<a href="" onmouseover="document.bgColor='red'">g</a>
<a href="" onmouseover="document.bgColor='yellow'">Y</a>
<a href="" onmouseover="document.bgColor='green'">o</a>
<a href="" onmouseover="document.bgColor='white'">u</a>
<a href="" onmouseover="document.bgColor='teal'">r</a>
<a href="" onmouseover="document.bgColor='olivedrab'">M</a>
<a href="" onmouseover="document.bgColor='green'">o</a>
<a href="" onmouseover="document.bgColor='seagreen'">u</a>
<a href="" onmouseover="document.bgColor='magenta'">s</a>
<a href="" onmouseover="document.bgColor='fusia'">e</a>
<a href="" onmouseover="document.bgColor='purple'">O</a>
<a href="" onmouseover="document.bgColor='navy'">v</a>
<a href="" onmouseover="document.bgColor='green'">e</a>
<a href="" onmouseover="document.bgColor='white'">r</a>
<a href="" onmouseover="document.bgColor='royalblue'">L</a>
<a href="" onmouseover="document.bgColor='Skyblue'">e</a>
<a href="" onmouseover="document.bgColor='almond'">tt</a>
<a href="" onmouseover="document.bgColor='coral'">e</a>
<a href="" onmouseover="document.bgColor='brown'">r</a>
<a href="" onmouseover="document.bgColor='almond'">s</a>
<a href="" onmouseover="document.bgColor='coral'">To</a>
<a href="" onmouseover="document.bgColor='olivedrab'">C</a>
<a href="" onmouseover="document.bgColor='teal'">h</a>
<a href="" onmouseover="document.bgColor='pink'">a</a>
<a href="" onmouseover="document.bgColor='blue'">n</a>
<a href="" onmouseover="document.bgColor='red'">g</a>
<a href="" onmouseover="document.bgColor='yellow'">e</a>
<a href="" onmouseover="document.bgColor='green'">C</a>
<a href="" onmouseover="document.bgColor='olivedrab'">ol</a>
<a href="" onmouseover="document.bgColor='black'">or!</a>
</center>
输出


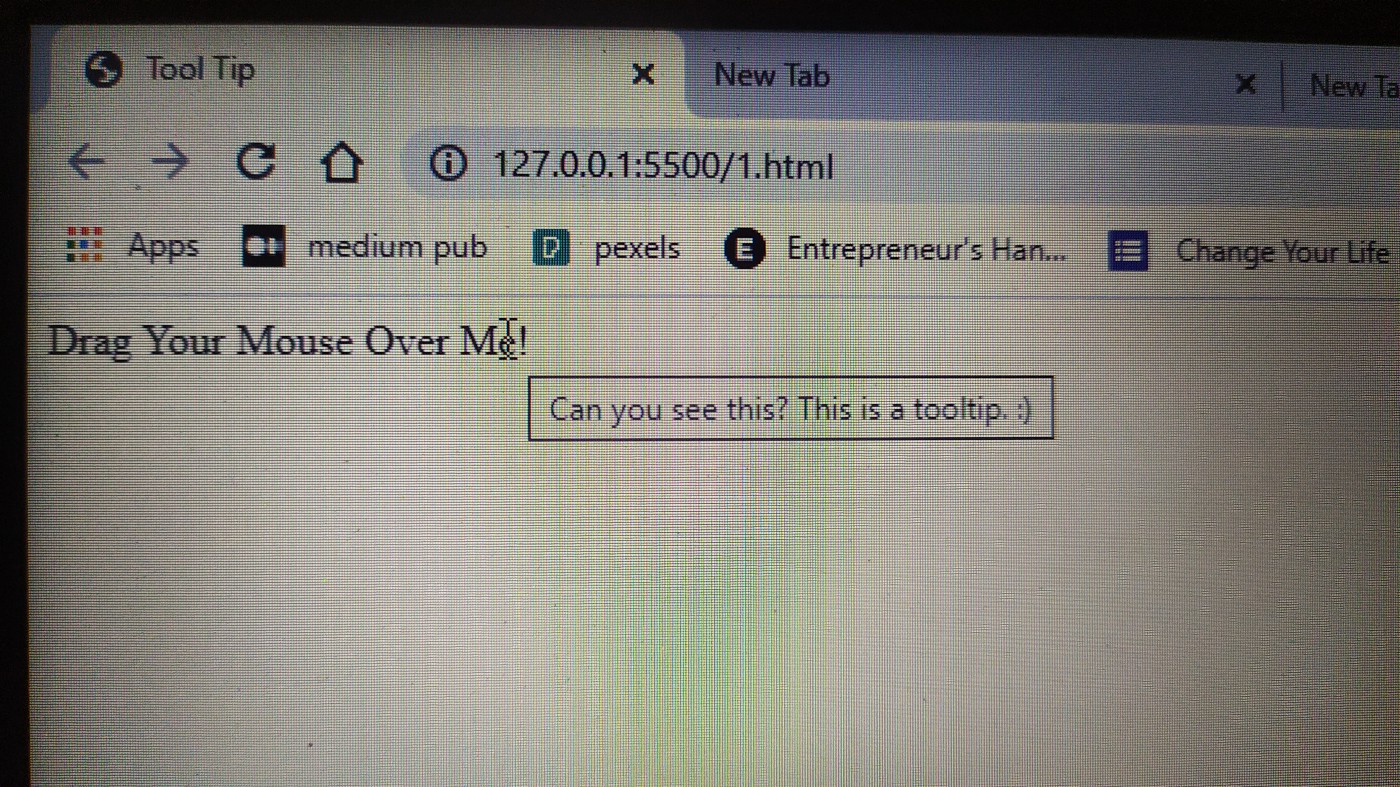
技巧4:添加Title Tooltip
Tooltip是“HTML中使用的一个概念,用于显示关于特定选定元素的一些额外信息”。
这个技巧基本上显示了当访问者将鼠标指针悬停在一个元素上时,网站创建者提供的额外信息。
语法:
<span title="Can you see this? This is the tooltip.:)">Drag Your Mouse Over Me!</span>
输出:
技巧5:语音识别
此功能类似于您在 Google 搜索文本框中看到的功能,其中语音识别功能可帮助您将句子放入输入字段。
当你使用语音识别输入时,在输入字段的边上会有一个小的麦克风图标显示,当访问者点击该语音图标时,他们的声音会被记录下来并作为用户的输入。
为此,您只需将 x-webkit-speech 属性添加到输入框。
<input type="text" x-webkit-speech />
让我给你看一个例子:
<!DOCTYPE html>
<html>
<head>
<title>Voice Recognition</title>
<style>
.container {
text-align: center;
}
h1 {
color: darkred;
}
</style>
</head>
<body>
<div class="container">
<h1>Voice Recognition Field</h1>
<input type="text" x-webkit-speech>
<i><br><br>The above field accepts the input as a Voice.<i>
</div>
</body>
</html>
输出,然而,在实时服务器中,你会看到这个:

但当你从其他浏览器查看时,你也会看到输入栏中的麦克风图标,用户可以通过它输入语音。
技巧6:隐藏字段
能够公开查看内部字段被Reddit士兵称为“编程恐怖”——毫无疑问,没有人想在自己的网站上体验这种恐怖。
但是这个问题可以通过使用HTML的隐藏字段特性来解决。
一个隐藏字段可以让web开发人员控制哪些数据可以被修改,哪些数据不能被修改,以及当用户提交表单时需要更新的记录。
语法:
<input type="hidden">
它是这样工作的:
<!DOCTYPE html>
<html>
<head>
<title>Hide Field</title>
<style>
h1 {
color: darkred;
}
body {
text-align: center;
}
</style>
</head>
<body>
<h1>HIDE FIELD</h1>
<form action="#">
<input type="hidden" id="myFile" value="1234">
Name: <input type="text">
<input type="submit" value="Submit">
</form>
</body>
</html>
从上面的代码中,结果输出将是一个访问者无法看到的隐藏字段。
输出:

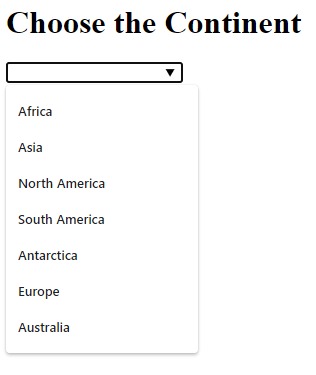
技巧7:输入建议
此功能基本上提供了一个预定义选项的下拉列表,使访问者更容易找到他们正在寻找的内容。
示例:下面的代码让访问者从下拉列表中找到不同大陆的名称,并将其用作输入。
<!DOCTYPE html>
<html>
<head>
<title>Input Suggestions</title>
</head>
<body>
<h1>Choose the Continent</h1>
<input type="text" list="text_editors">
<datalist id="text_editors">
<option value="Africa"></option>
<option value="Asia"></option>
<option value="North America"></option>
<option value="South America"></option>
<option value="Antarctica"></option>
<option value="Europe"></option>
<option value="Australia"></option>
</datalist>
</body>
</html>
输出:
相关推荐


0评论