这篇文章主要介绍了vxe-list vue 如何实现下拉框的虚拟列表,具有很好的参考价值,希望对大家有所帮助。如有错误或未考虑完全的地方,望不吝赐教
vxe-list vue 下拉框的虚拟列表
vue 实现下拉框的虚拟列表
虚拟列表的实现原理
只渲染可视区的 dom 节点,其余不可见的数据卷起来,只会渲染可视区域的 dom 节点,提高渲染性能及流畅性,优点是支持海量数据的渲染;当然也会有缺点:滚动效果相对略差(海量数据与滚动效果的取舍问题就看自己的需求喽);
<div>
    <input type="text" readonly>
    <vxe-list :loading="loading"
     :data="list">
              <template v-slot="{ items }">
              <div v-for="item in items"
               :key="item.value">{{ item.label }}</div>
               </template>
               </vxe-list>
               </div>
export default {
     data () {
     return {
     loading: false,
     list: []
     }
     },
     created () {
     this.loading = true
     setTimeout(() => {
     const startTime = Date.now()
     var list = []
     for(var i=0;i<100000;i++){
     list.push({
     label: '选项'+i,
     value: i
      })
      }
      this.list = list
      this.loading = false
      this.$nextTick(() => {
      this.$XModal.message({ message: `渲染 ${list.length} 行,用时 ${Date.now() - startTime}毫秒`, status: 'info' })
                   })
                   },
                   200)
                   }
                   }
.my-select {
width: 200px;
position: relative;
background-color: #fff; }
.my-select-input {
     width: 100%;
     height: 24px;
     border: 1px solid #dcdfe6;
     }
      .my-select-wrapper {
      position: absolute;
      left: 0;
      top: 26px;
      width: 100%;
      height: 200px;
      background-color: #fff;
      border: 1px solid #dcdfe6;
       }
       .my-select-option:hover {
       background-color: #f5f7fa;
       cursor: pointer;
       }
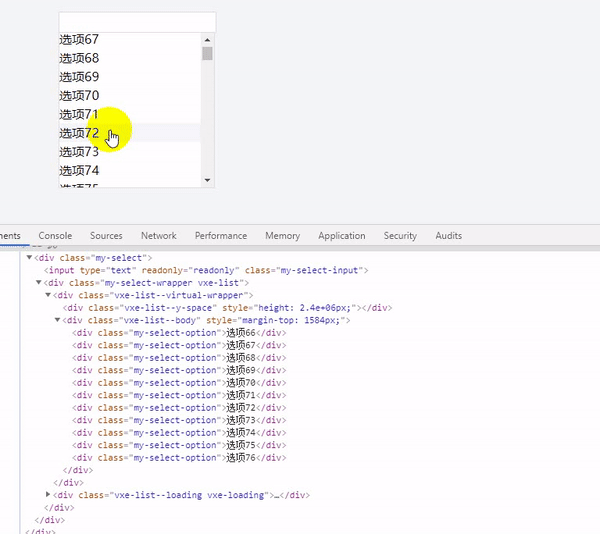
编辑
接下来测试一下
渲染 1w 条只需要 150 毫秒左右
渲染 5w 条只需要 300 毫秒左右
渲染 10w 条只需要 500 毫秒左右
具体用法可以去看 ,在线运行
vue虚拟列表实现原理
应用场景
前端的业务开发中会遇到不使用分页方式来加载长列表的需求。如在数据长度大于 1000 条情况,DOM 元素的创建和渲染需要的时间成本很高,完整渲染列表所需要的时间不可接受,同时会存在滚动时卡顿问题;
解决该卡顿问题的重点在于如何降低长列表DOM渲染成本问题,文章将介绍通过虚拟列表渲染的方式解决该问题。
为什么需要虚拟列表
虚拟列表是对长列表的一种优化方案。在前端开发中,会碰到一些不能使用分页方式来加载列表数据的业务形态,我们称这种列表叫做长列表。比如,手机端,淘宝商品展示,美团外卖等,数据量特别庞大,不适合分页,以及懒加载,这时候我们可以采用虚拟列表,只展示可视区域数据。
实现思路
虚拟列表的核心思想为可视区域渲染,在页面滚动时对数据进行截取、复用DOM进行展示的渲染方式。
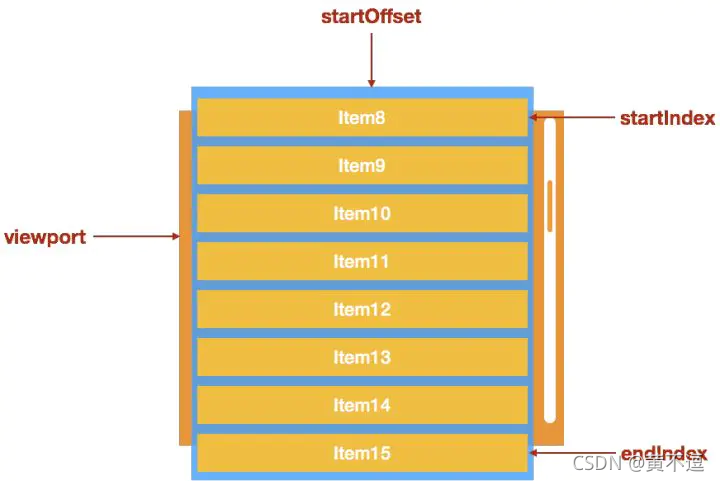
实现虚拟列表就是处理滚动条滚动后的可见区域的变更,其中具体步骤如下:
1.计算当前可见区域起始数据的 startIndex
2.计算当前可见区域结束数据的 endIndex
3.计算当前可见区域的数据,并渲染到页面中
4.计算 startIndex 对应的数据在整个列表中的偏移位置 startOffset,并设置到列表上
编辑
基础实现
列表元素(.list-view)使用相对定位
使用一个不可见元素(.list-view-phantom)撑起这个列表,让列表的滚动条出现
列表的可见元素(.list-view-content)使用绝对定位,left、right、top 设置为 0
html:
<template>
      <div
      class="list-view"
      :style="{
      height: `${height}px`     }"
      @scroll="handleScroll">
      <div
      class="list-view-phantom"
      :style="{
      height: contentHeight
      }">
      </div>
      <ul
      ref="content"
      class="list-view-content">
                   <li
                   class="list-view-item"
                   :style="{
                   height: itemHeight + 'px'
                   }"
                   v-for="(item, index) in visibleData"
                   :key="index">
                   {{ item }}
                   </li>
                   </ul>
                   </div>
                   </template>
script:
<script> export default {
     name: 'ListView',
     props: {
     data: {
     type: Array,
     default: function() {
     const list = []
     for (let i = 0; i < 1000000; i++) {
     list.push('列表' + i)
     }
     return list
     }
     },
     height: {
     type: Number,
     default: 400
     },
     itemHeight:
     {
     type: Number,
     default: 30
     },
     },
     computed: {
     contentHeight() {
     return this.data.length * this.itemHeight + 'px';
     }
     },
      mounted() {
     this.updateVisibleData();
     },
     data()
     {
     return {
     visibleData: []
     };
     },
     methods: {
     updateVisibleData(scrollTop) {
     scrollTop = scrollTop || 0;
          const visibleCount = Math.ceil(this.$el.clientHeight / this.itemHeight);
          // 取得可见区域的可见列表项数量
          const start = Math.floor(scrollTop / this.itemHeight);
          // 取得可见区域的起始数据索引
          const end = start + visibleCount;
          // 取得可见区域的结束数据索引
          this.visibleData = this.data.slice(start, end);
          // 计算出可见区域对应的数据,让 Vue.js 更新
          this.$refs.content.style.webkitTransform = `translate3d(0, ${ start * this.itemHeight }px, 0)`;
          // 把可见区域的 top 设置为起始元素在整个列表中的位置(使用 transform 是为了更好的性能)
          },
          handleScroll() {
          const scrollTop = this.$el.scrollTop;
          this.updateVisibleData(scrollTop);
          }
          }
          }
          </script>
css:
<style scoped> .list-view {
     overflow: auto;
     position: relative;
     border: 1px solid #aaa;
     width: 200px; } .list-view-phantom {
     position: absolute;
     left: 0;
     top: 0;
     right: 0;
     z-index: -1; } .list-view-content {
     left: 0;
     right: 0;
     top: 0;
     position: absolute; } .list-view-item {
     padding: 5px;
     color: #666;
     line-height: 30px;
     box-sizing: border-box; }
     </style>
发表评论 取消回复