1.布局优化
1 Android UI渲染机制
玩过游戏的都知道fps大概在60fps左右才最好。在Android中,系统通过VSYNC信号触发对UI的渲染、重绘,其间隔时间是16ms.如果不能在16ms完成绘制,就会出现丢帧现象,即当前该重绘的帧被未完成的逻辑阻塞。
例如一次绘制任何要20ms,那么在16ms系统发出VSYNC信号是就无法绘制,该帧就会被丢弃,等待下次信号才开始绘制,导致16*2ms内都显示同一帧画面,这就是画面卡顿的原因。
2 避免Overdraw
过度地绘制会浪费很多的CPU、GPU资源。比如系统默认绘制了Activity的背景,但是我们又给这个布局绘制了重叠的背景,那么默认Activity的背景就属于无效的过度绘制即Overdraw了。就有种你那两张白纸画画的感觉,你只需要一幅画,你下面那张已经画完了,还画一张把它覆盖在上面,这样就没有什么意义了。
举个例子:
<?xml version="1.0" encoding="utf-8"?>
<RelativeLayout xmlns:android="http://schemas.android.com/apk/res/android"
    xmlns:tools="http://schemas.android.com/tools"
    android:id="@+id/activity_main"
    android:layout_width="match_parent"
    android:layout_height="match_parent"
    android:background="@drawable/beauty_girl"
    tools:context="com.example.test.MainActivity">

    <LinearLayout
        android:layout_width="match_parent"
        android:layout_height="match_parent"
        android:background="@drawable/beauty_girl"></LinearLayout>


</RelativeLayout>
我两个布局Layout都用同一个背景backgroud="@drawable/beauty_girl.效果如下:

怎么样?是不是两个背景重叠在一起了?这样不就Overdraw了吗?
3 优化布局层级
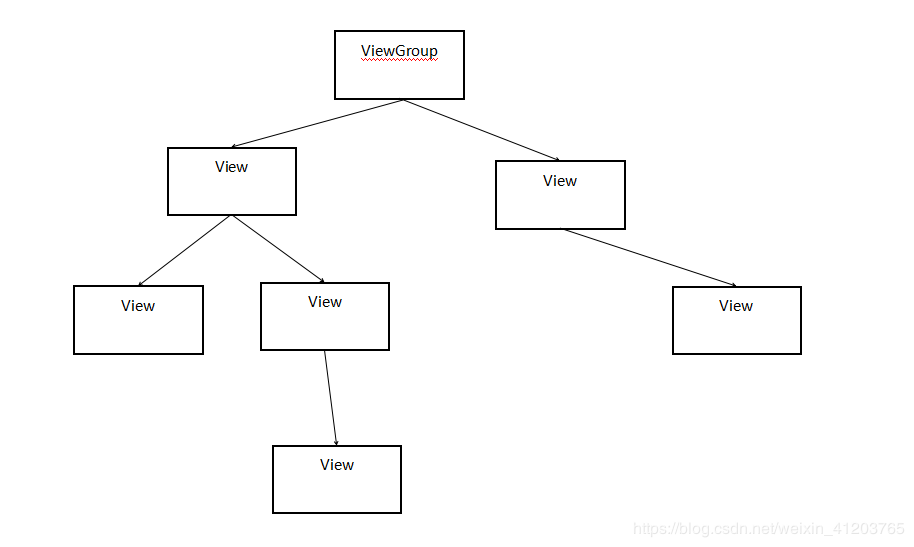
在Android中,是有一个View树的,绘制的时候都是通过遍历View树来进行操作的。如果这个View树高度太高的话,就会影响速度,因此,我们可以通过降低View树的高度来优化,一般的建议是不超过10层。
下面是View树图:

ViewGroup作为控件树,其实就是一个树根。平时我们用findViewById(),就是从根树出发遍历的。
遍历采用的是深度优先算法(不懂深度优先算法的可以回去看一下数据结构)。
所以,View树的层数越大的话,遍历的时间复杂度就越大,从而影响绘制View,进而就影响性能了。
4 使用<include>标签达到重用Layout
<include>标签,相信大家初学Android的时候都会用到这个标签,要知道,这是可以重用的。
比如下面的布局common_ui
<?xml version="1.0" encoding="utf-8"?>
<TextView xmlns:android="http://schemas.android.com/apk/res/android"
            android:layout_width="0dp"
            android:layout_height="0dp"
            android:textSize="30sp"
            android:gravity="center"
            android:text="这是共通UI">

</TextView>
然后在其他布局,通过include就可以把它引进来了。在代码中,将layout_width和layout_height设置为0dp,这样就迫使开发者在使用时对宽高进行赋值,否则将无法看到这个界面。下面是include的代码:
<?xml version="1.0" encoding="utf-8"?>
<RelativeLayout xmlns:android="http://schemas.android.com/apk/res/android"
    xmlns:tools="http://schemas.android.com/tools"
    android:id="@+id/activity_main"
    android:layout_width="match_parent"
    android:layout_height="match_parent"
    tools:context="com.example.myapplication.MainActivity">

    <include layout="@layout/common_ui"
        android:layout_width="match_parent"
        android:layout_height="match_parent"></include>
</RelativeLayout>
5使用<ViewStub>实现View的延迟加载
下面是一个布局demo.xml
<?xml version="1.0" encoding="utf-8"?>
<LinearLayout xmlns:andorid="http://schemas.android.com/apk/res/android"
    andorid:layout_width="match_parent"
    andorid:layout_height="match_parent">

    <TextView
        andorid:id="@+id/tv"
        andorid:layout_width="wrap_content"
        andorid:layout_height="wrap_content"
        andorid:text="不经常用的布局"/>

</LinearLayout>
然后通过<ViewStub>引用demo.xml。代码如下:
<?xml version="1.0" encoding="utf-8"?>
<RelativeLayout xmlns:android="http://schemas.android.com/apk/res/android"
    xmlns:tools="http://schemas.android.com/tools"
    android:id="@+id/activity_main"
    android:layout_width="match_parent"
    android:layout_height="match_parent"
    tools:context="com.example.myapplication.MainActivity">

    <ViewStub
        android:id="@+id/not_often_use"
        android:layout_width="match_parent"
        android:layout_height="wrap_content"
        android:layout="@layout/demo"/>
</RelativeLayout>
那么我们怎样使用呢?首先通过findViewById()方法找到<ViwStub>组件。
mViewStub = (ViewStub) findViewById(R.id.not_often_use);
然后用两种方式显示这个View
VISIBLE
mViewStub.setVisibility(View.VISIBLE);
inflate
View inflateView = mViewStub.inflate();
这两个方式的区别在于inflate()方法可以返回引用的布局,从而可以再通过View.findViewById()方法找到对应的控件,代码如下所示:
View inflateView = mViewStub.inflate();
TextView textView = (TextView) inflateView.findViewById(R.id.tv);
textView.setText("Hello");

发表评论 取消回复